How to Make a Resin Keychain (Beginner Friendly)
Resin keychains are one of my favorite small projects—they’re quick to make, endlessly customizable, and perfect as gifts or even as tags tied onto larger gifts. Whether you’re brand new to resin or just want a simple, satisfying project, this tutorial will walk you through the basics.
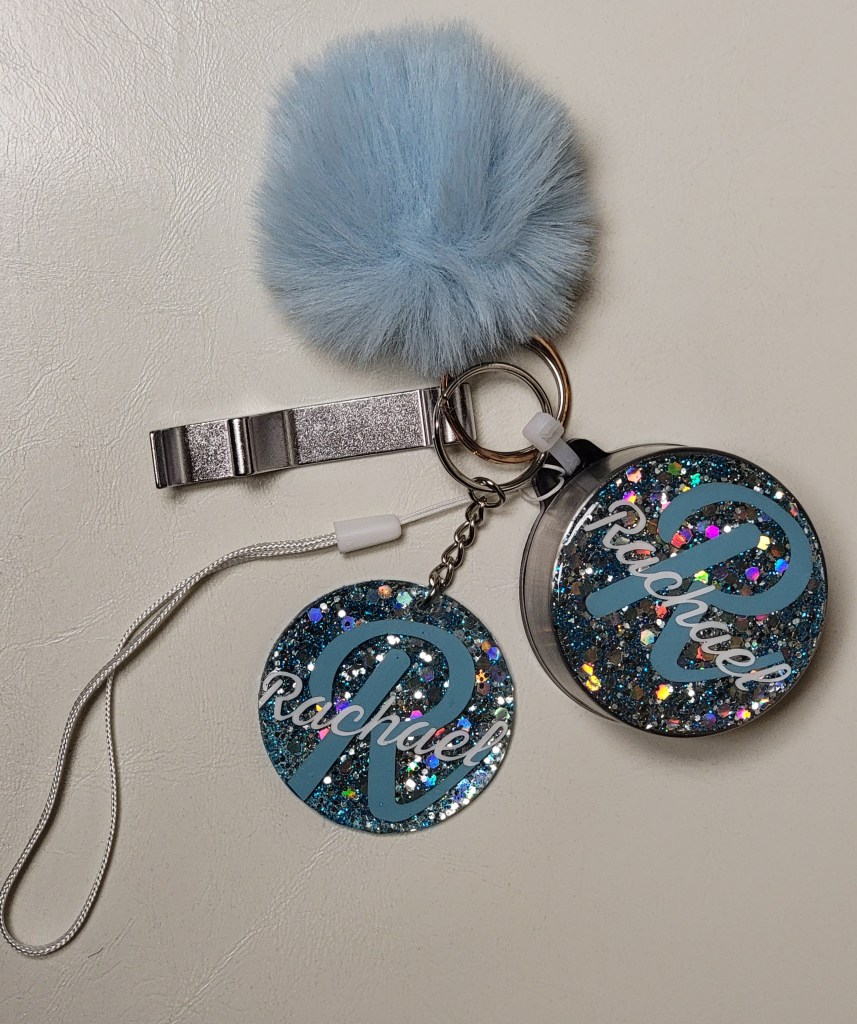
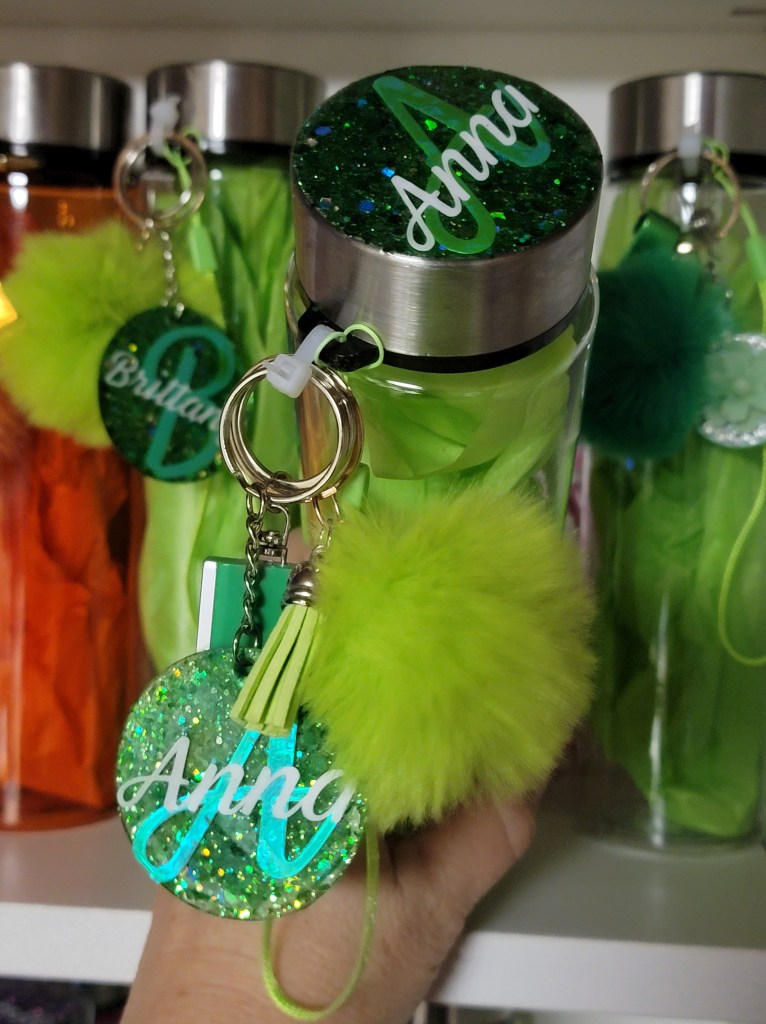
These keychains are one of my signature projects, and the exact same steps can also be used to create a matching water bottle lid—it’s just slightly larger than the keychain. Together, they make the perfect personalized combo (in my opinion).
Below, I’ll show you the supplies I use, how to set up your workspace, and the first steps to getting a clean, successful resin result.
📢 Affiliate Disclosure
As an Amazon Associate, I earn from qualifying purchases. This means that if you click on a link and make a purchase, I may earn a small commission at no extra cost to you. This helps support this site and allows me to continue sharing creative tutorials and inspiration. 💛
Supplies Used in This Project
Before you begin, gather your materials so everything is within reach:
- UV resin or epoxy resin
- Keychain blanks
- Glitter, confetti, or decorative fillers
- Mixing cups
- Stir sticks or craft sticks
- Plastic spoons or droppers
- UV lamp (if using UV resin)
- Gloves and paper towels
- Keychain hardware will come with the blanks
- Optional: Cricut Joy and vinyl
Tip: Small projects like keychains are perfect for using up leftover resin or experimenting with new embellishments.
Step One: Work on a Clean Area
This step may sound obvious, but it’s one of the most important parts of resin crafting.
Set up your workspace on a flat, clean surface that you don’t mind getting messy. Resin is sticky and unforgiving, so I always recommend protecting your table with parchment paper, a silicone mat, or cardstock. In these pictures I used a simple sheet of paper to protect my workspace.

In the photo above, you’ll see my workspace fully prepped with:
- All tools within arm’s reach
- Resin standing upright to prevent spills
- Small cups and spoons organized for easy access
A clean area helps prevent dust, hair, or debris from settling into your resin while it cures—and trust me, resin shows everything.
Step Two: Prepare the Acrylic Blank
The acrylic blanks I use come with a protective film on both sides, and this step is very important for a clean, professional finish.
Before adding any resin, carefully peel the film off each side of the blank. It can sometimes be hard to see, but gently lifting a corner with your fingernail usually does the trick.
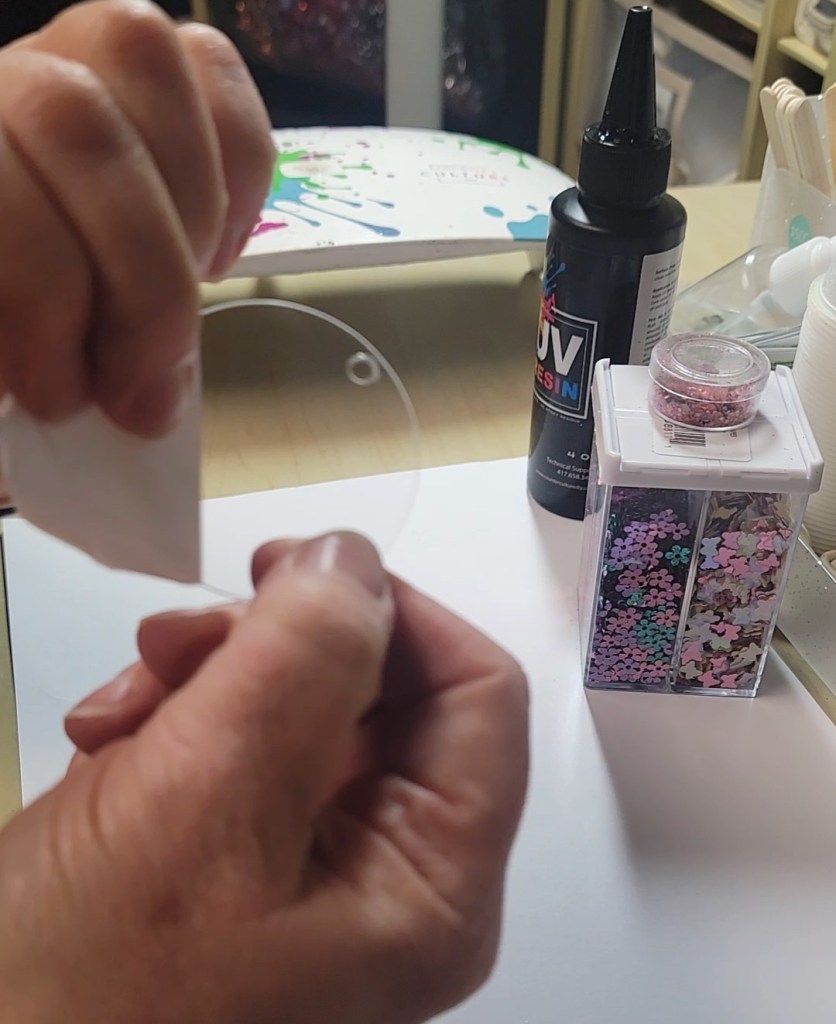
Once both sides are uncovered, use an alcohol swab to wipe down the front and back of the blank. This removes fingerprints, dust, and any residue that could interfere with resin adhesion or clarity.
Taking a few extra seconds here ensures:
- Better resin bonding
- A smoother finish
- No cloudy spots or trapped debris
Clean blanks make a big difference in how polished your finished keychain looks.
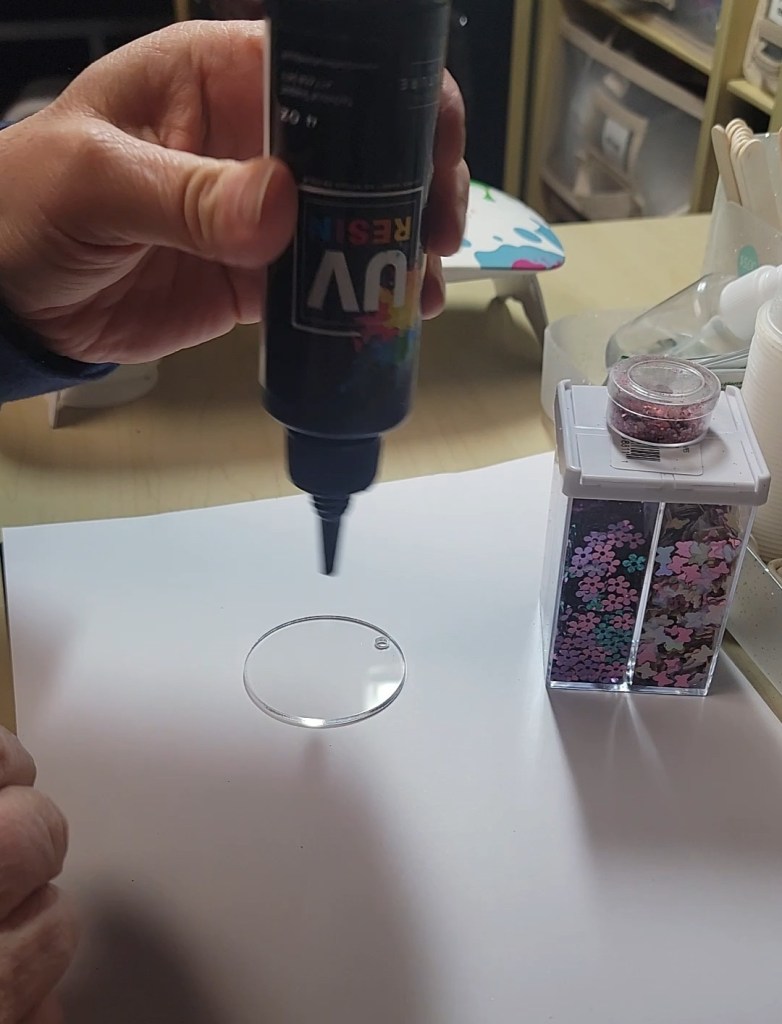
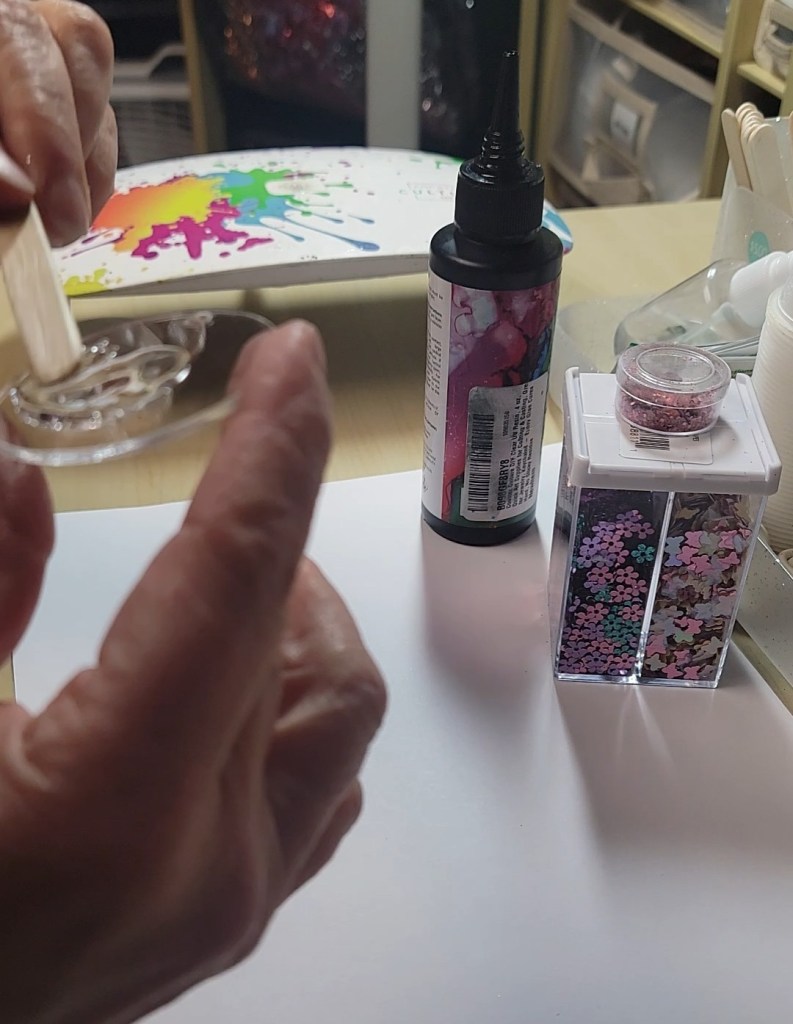
Step Three: Apply and Spread the UV Resin
Place a small amount of UV resin in the center of the acrylic blank. Starting in the middle helps control the resin and prevents it from spilling over the edges too quickly.
Using a popsicle stick (my tool of choice), gently spread the resin outward in smooth, even motions. Work slowly and guide the resin all the way to the edges, making sure the entire surface is fully coated.
Take your time with this step:
- Keep the layer even
- Watch for thin spots near the edges
- Smooth out any lines or bubbles as you go (you can use a hot air gun to blow out bubbles)
The goal is a clean, glossy layer that reaches edge to edge without overflowing. A little patience here makes a big difference in the final look of your keychain.
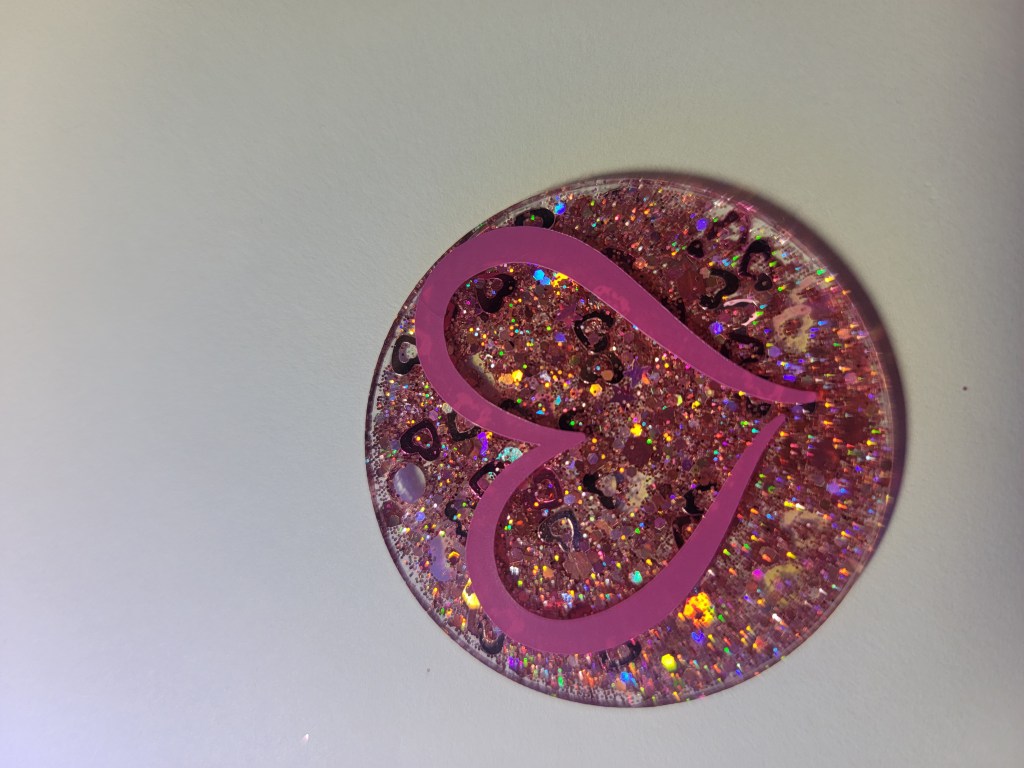
Step Four: Add Glitter and Embellishments
Once the blank is fully covered with resin, it’s time to add your glitter or embellishments.
Sprinkle them evenly over the surface until the entire blank is covered the way you like. You can layer different glitters or mix textures for extra interest—this is where your creativity really gets to shine.
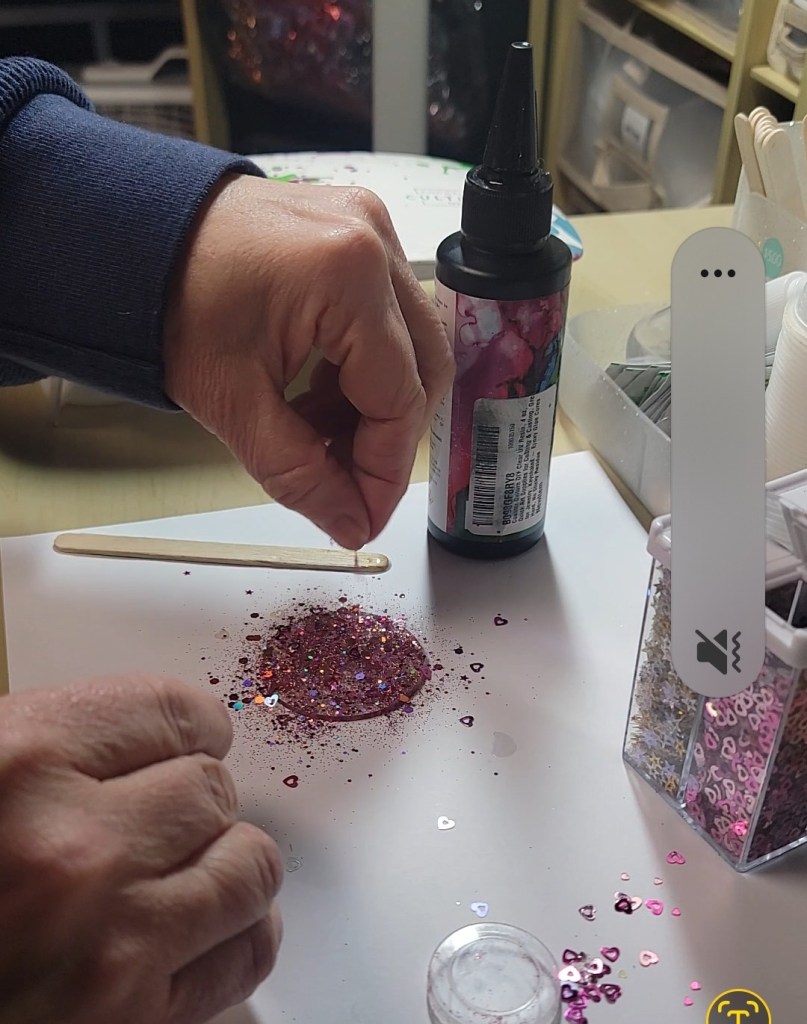
Important tip:
Be very careful to keep the keyhole area clear. Avoid letting resin or glitter settle into the hole, as this can make it smaller or completely fill it in, which makes attaching the keychain hardware much harder later.
If needed, use the tip of your popsicle stick to gently guide glitter away from the hole before curing.
Taking a moment to check this now will save you frustration later and keep your keychain functional and beautiful.
Step Five: Cure the Resin Under UV Light
Once you’re happy with how the surface of your acrylic blank looks, it’s time to cure the resin.
Carefully place the blank under a UV light for about 60 seconds. This will harden the UV resin and lock your glitter and embellishments in place.
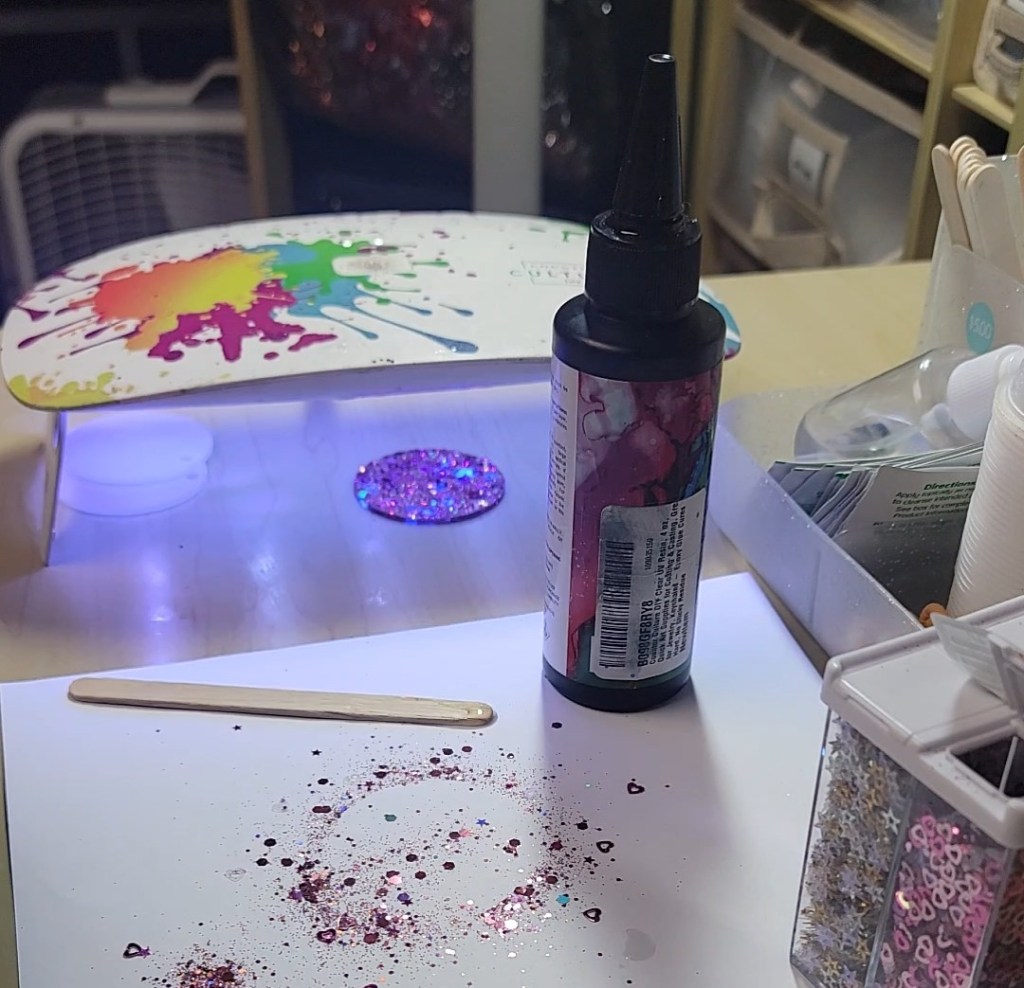
After curing, the surface should feel smooth and set to the touch. This first cure creates a solid base and prepares the blank for a second coat of resin, which helps seal everything in and gives your keychain that glossy, finished look.
If the surface still feels tacky, you can cure it for an additional 10–20 seconds before moving on.
Step Six: Apply the Second Coat of UV Resin
Once you’re sure the first coat is fully cured, it’s time to apply a second layer of UV resin. This step is what gives your keychain a smooth, professional finish.
Add a thin layer of UV resin over the top of the glitter and gently spread it evenly across the surface, again working all the way to the edges. This coat helps smooth out any texture from the glitter and seals everything in place.
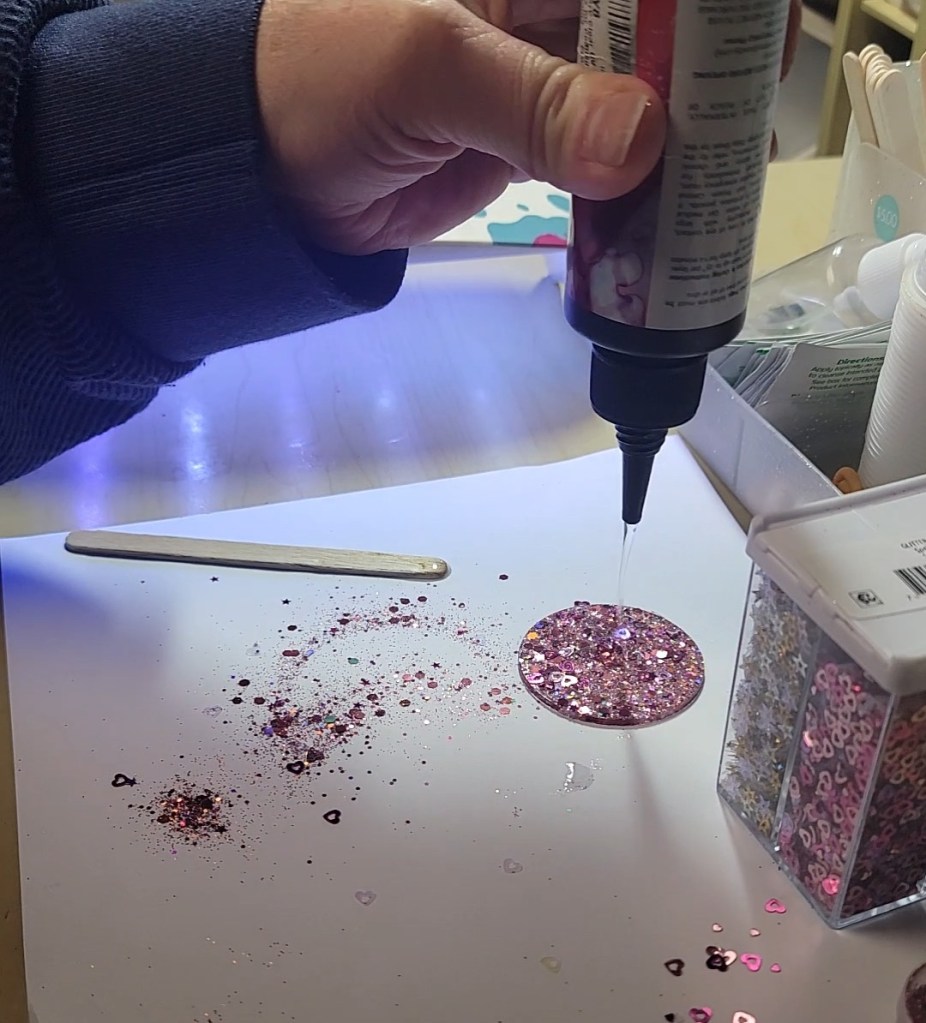
Make sure the resin:
- Covers the entire surface evenly
- Doesn’t overflow the edges
- Stays clear of the keyhole
Place under the UV light a second time for 60 seconds. You can cure it longer if needed—additional curing time won’t harm the project. This second coat will fully harden the surface and give your keychain that glossy, durable finish once it’s cured.
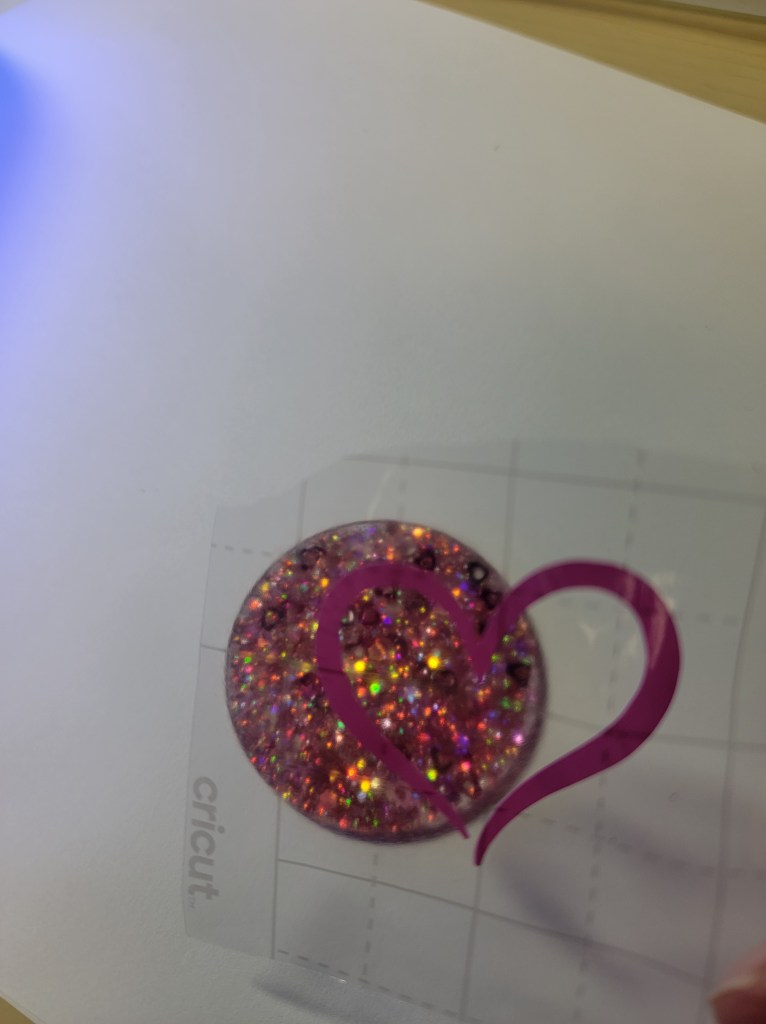
Step Seven: Customize the Back of the Acrylic Blank
At this point, the front side of the project is complete. The rest of the design will be done on the other side of the acrylic blank.
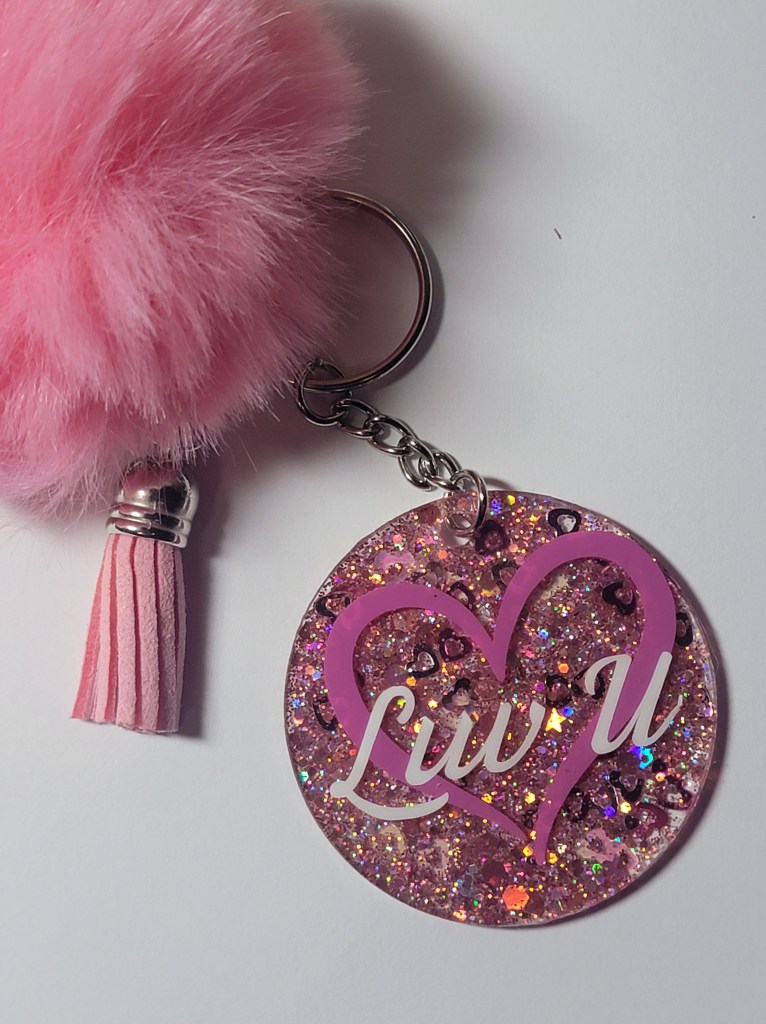
For this step, you can add any customization you’d like using the flat side of the acrylic. I used two different colors of Cricut vinyl—a larger heart as the base, then layered letters on top. This is a great way to personalize your keychain.

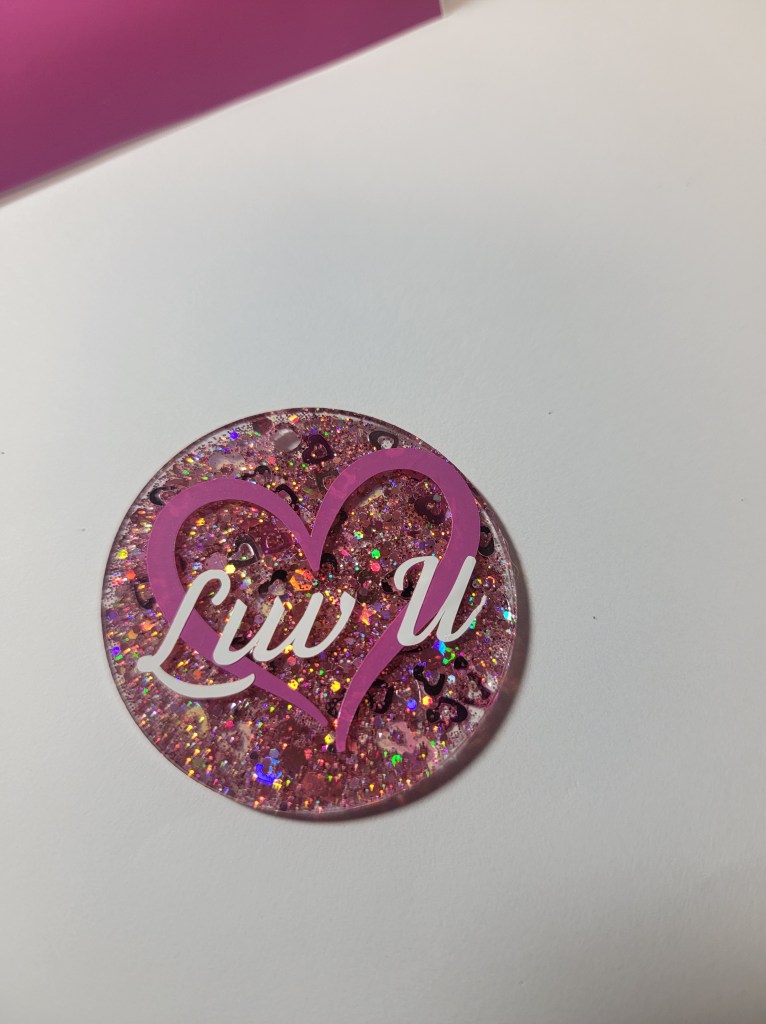
You can customize it with:
- A name
- Initials
- A short message
- Shapes, icons, or symbols
Apply your vinyl design carefully to the flat side of the acrylic, pressing it down smoothly so it adheres well with no bubbles.
This step is where the keychain truly becomes personal and meaningful, making it perfect for gifts, events, or special keepsakes.
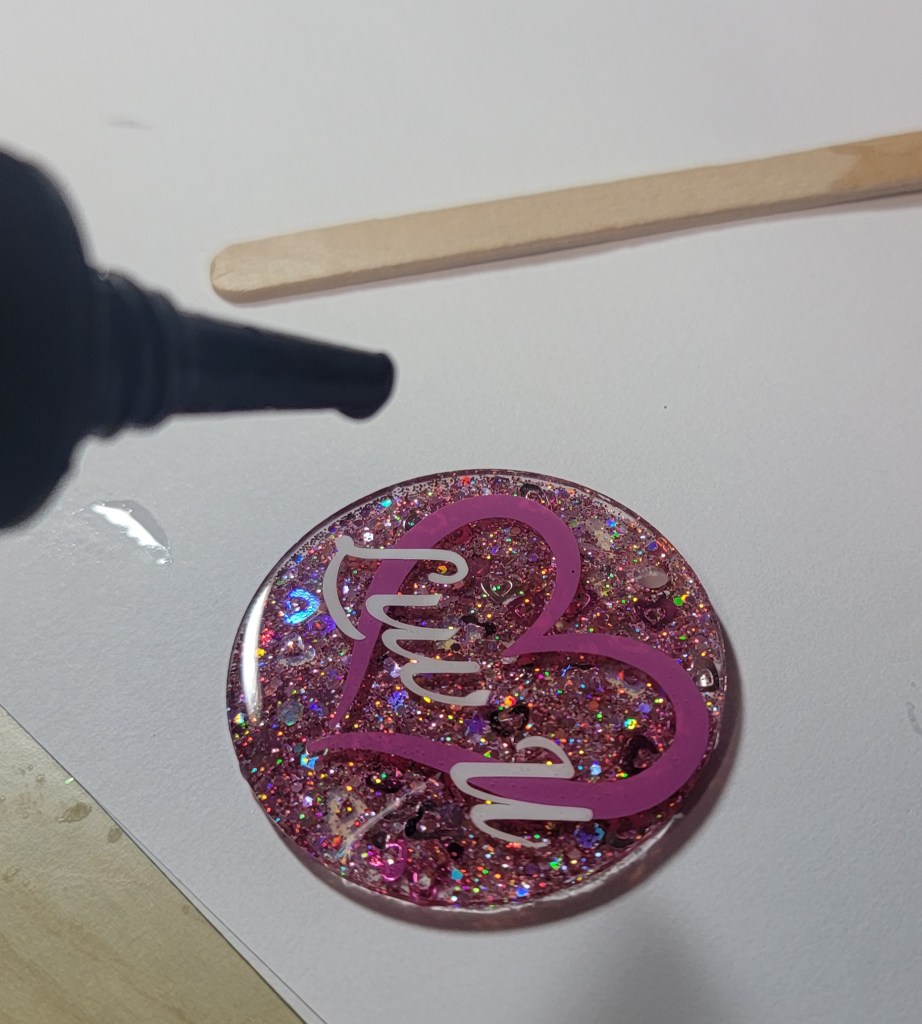
Step Eight: Seal, Cure, and Add the Keychain Hardware
Once your message or vinyl design is in place, it’s time to seal the back of the acrylic blank.
Apply one coat of UV resin, just like you did on the front side. Place the resin in the center and carefully spread it all the way to the edges, making sure the surface is smooth and evenly coated.
Cure the resin under a UV light for at least 60 seconds. If the surface still feels tacky or soft, cure it a little longer until it’s fully hardened.
Once cured, your keychain is officially finished and ready for the final touch—adding the keychain hardware.
At this point, you’ll have a fully sealed, customized resin keychain that’s durable, glossy, and ready to use or gift.
Resin keychains are a fun and rewarding project that beautifully combine creativity and function. With just a few simple steps, you can transform an acrylic blank into a personalized piece that’s perfect for gifts, events, or handmade sales. As you continue experimenting with different glitters, vinyl, and designs, having the right supplies on hand makes the process smoother and more enjoyable.
I’d love to hear how your keychains turn out! Feel free to share your results.
🛒 Shop the Supplies Used in This Project
(These are the supplies I personally use and recommend.)
- UV Resin (link)
- UV Light/Lamp (link)
- Acrylic Blanks (link)
- Popsicle sticks or resin spreaders (link)
- Alcohol swabs (link)
- Glitter & embellishments (link)
- Keychain hardware will come with the blanks (link)
- Optional: Cricut Joy and vinyl
- Optional: Adding other interest dangles. I added pom poms.
Read Privacy Policy for details


Leave a reply to Annette Reitano Cancel reply